
In this article I will cover the most popular rate-limiting algorithms that may come in handy when you do a system design. But before we dive into algorithms, here’s a short intro:
What is Rate Limiting?
A rate limiter is a proxy component that sits between the client and the target system. Its job is to control how many times a client can access the target system within a specified period.
For example:
- LeetCode accepts a solution submission once per second.
- OpenAI allows 100 requests per minute for the free tier.
- In Plants vs. Zombies, the daily reward can be claimed only once per day.
- Discord allows you to change your username twice per hour.
Rate limiting is essential for mitigating issues such as DDoS attacks, denial-of-wallet attacks (especially when you’re proxying pay-per-request third-party APIs), or generally preventing overuse of your API in accordance with your business rules.
Rate limiting can be implemented in-process or via separate middleware (e.g., AWS API Gateway).
Rate Limiting Algorithms
Token Bucket
Imagine a bucket 🪣 that can hold a fixed number of tokens 🪙. Each time a request is made, it consumes one token. If there are no tokens left, the request is denied. Tokens are refilled at a certain rate.
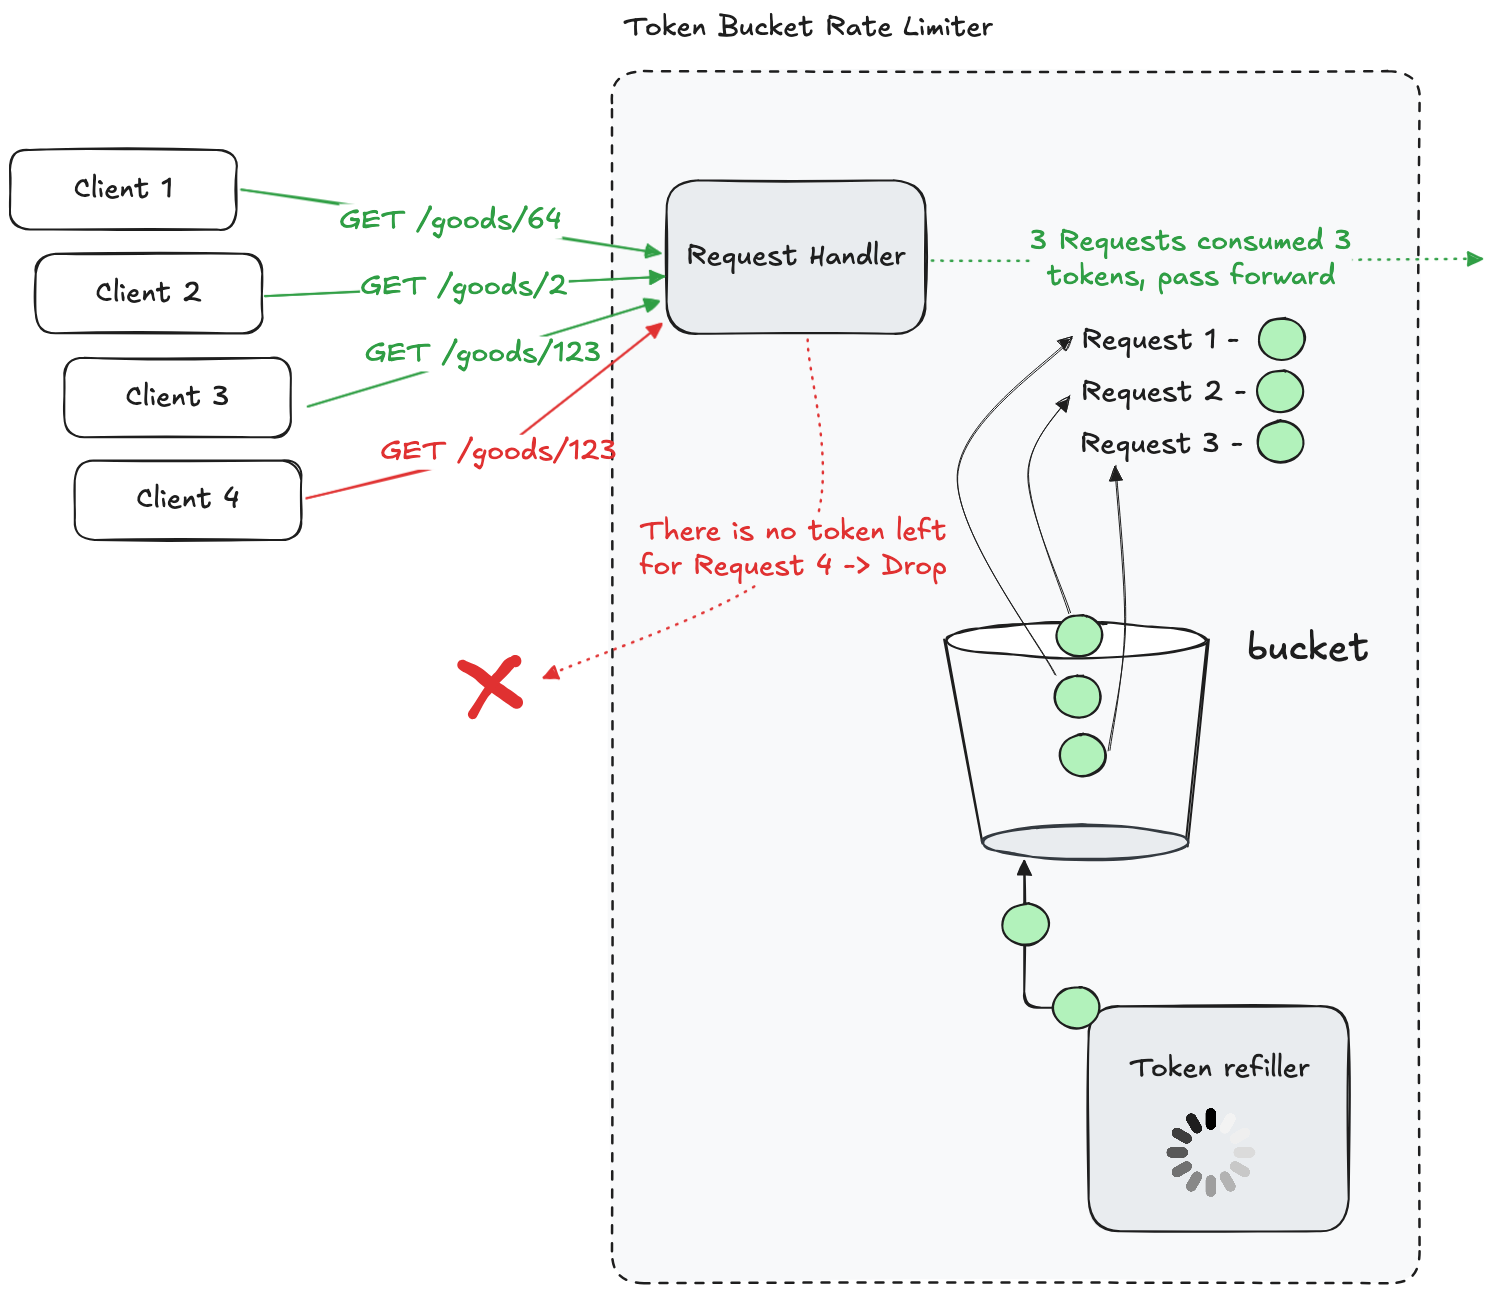
The algorithm has certain advantages - during “quiet” times it can tolerate sudden traffic spikes. However, this could also be a disadvantage if not tuned properly - requests are not processed at a smooth rate.
Leaky (Request) Bucket
Imagine a bucket 🪣 with a small hole 🕳️ at the bottom. Requests 💧 are poured into the bucket, and they leak out at a constant rate. If the bucket overflows (= requests exceed the bucket’s capacity), any new requests are denied.
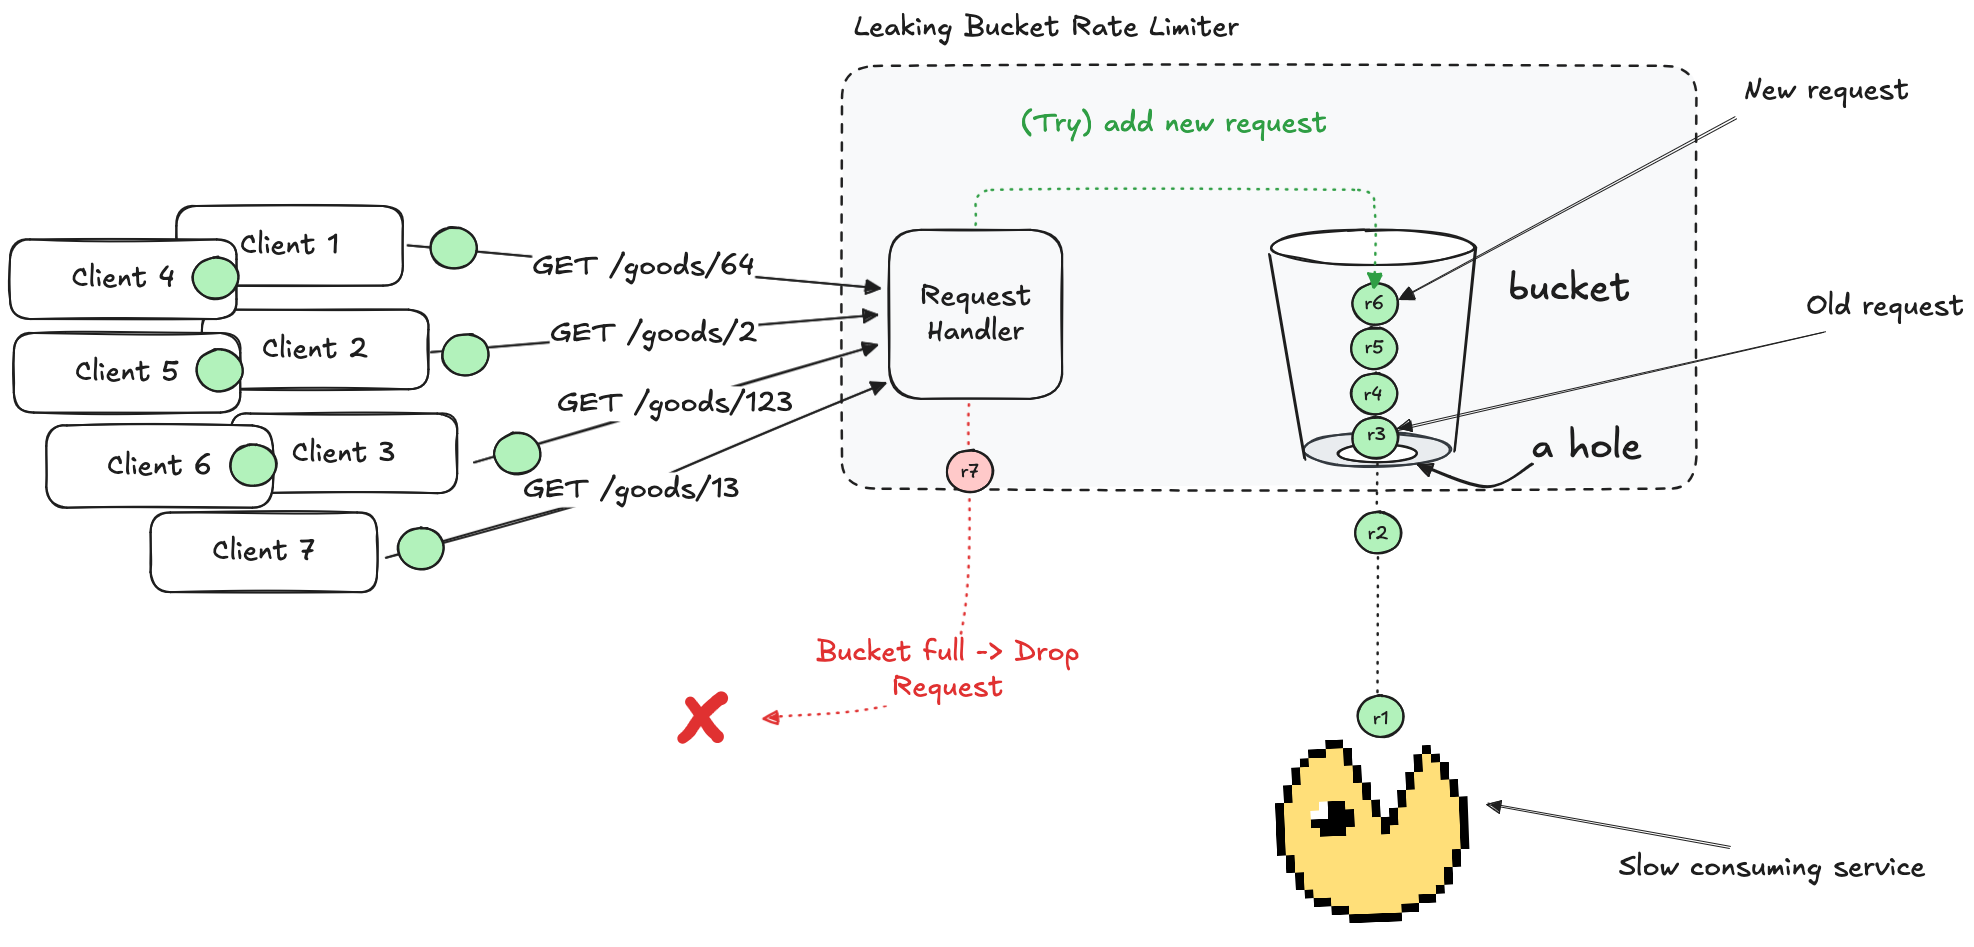
In technical terms, the bucket functions as a queue where new requests are added, and a consumer processes (polls) the queue at a constant rate. This approach is particularly useful for services that take a long time to process requests (video processing or a language server) where bursts of incoming requests are unacceptable.
While this approach works well for some workloads, it can be problematic for others. If request processing speed is slow, the queue may fill up, causing new requests to be dropped. Since older requests remain in the queue, they may become stale by the time they are processed.
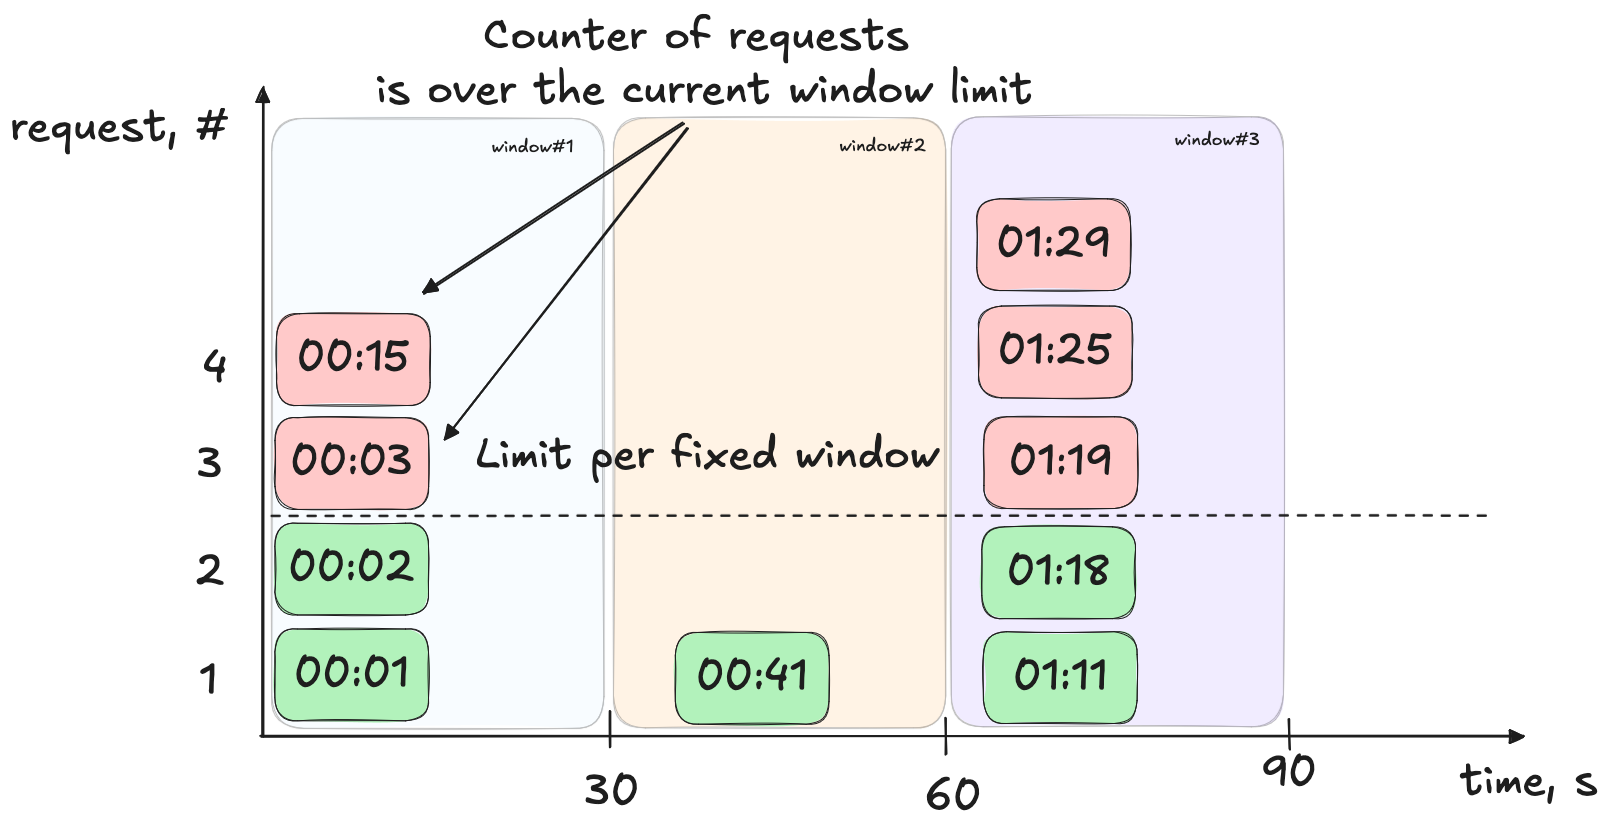
Fixed Window (Request) Counter
The Fixed Window Counter is another simple and frequently used algorithm. The idea is straightforward:
- Define a fixed time interval (let’s take 30 seconds).
- Set a maximum number of requests allowed during that interval (let’s take 2 requests).
- With each incoming request, increment a counter. Once the counter reaches the limit, further requests are dropped.
- When the time interval elapses, reset the counter.
Let me demonstrate one problem this algorithm has.
Assume we have a limit of 2 requests per 30 seconds. Now, imagine that during the first 15 seconds, no requests are made. Then, in the remaining 15 seconds, 2 requests arrive and are accepted. At the start of the 31st second, the counter resets, allowing another 2 requests to pass within the first half of that new interval.
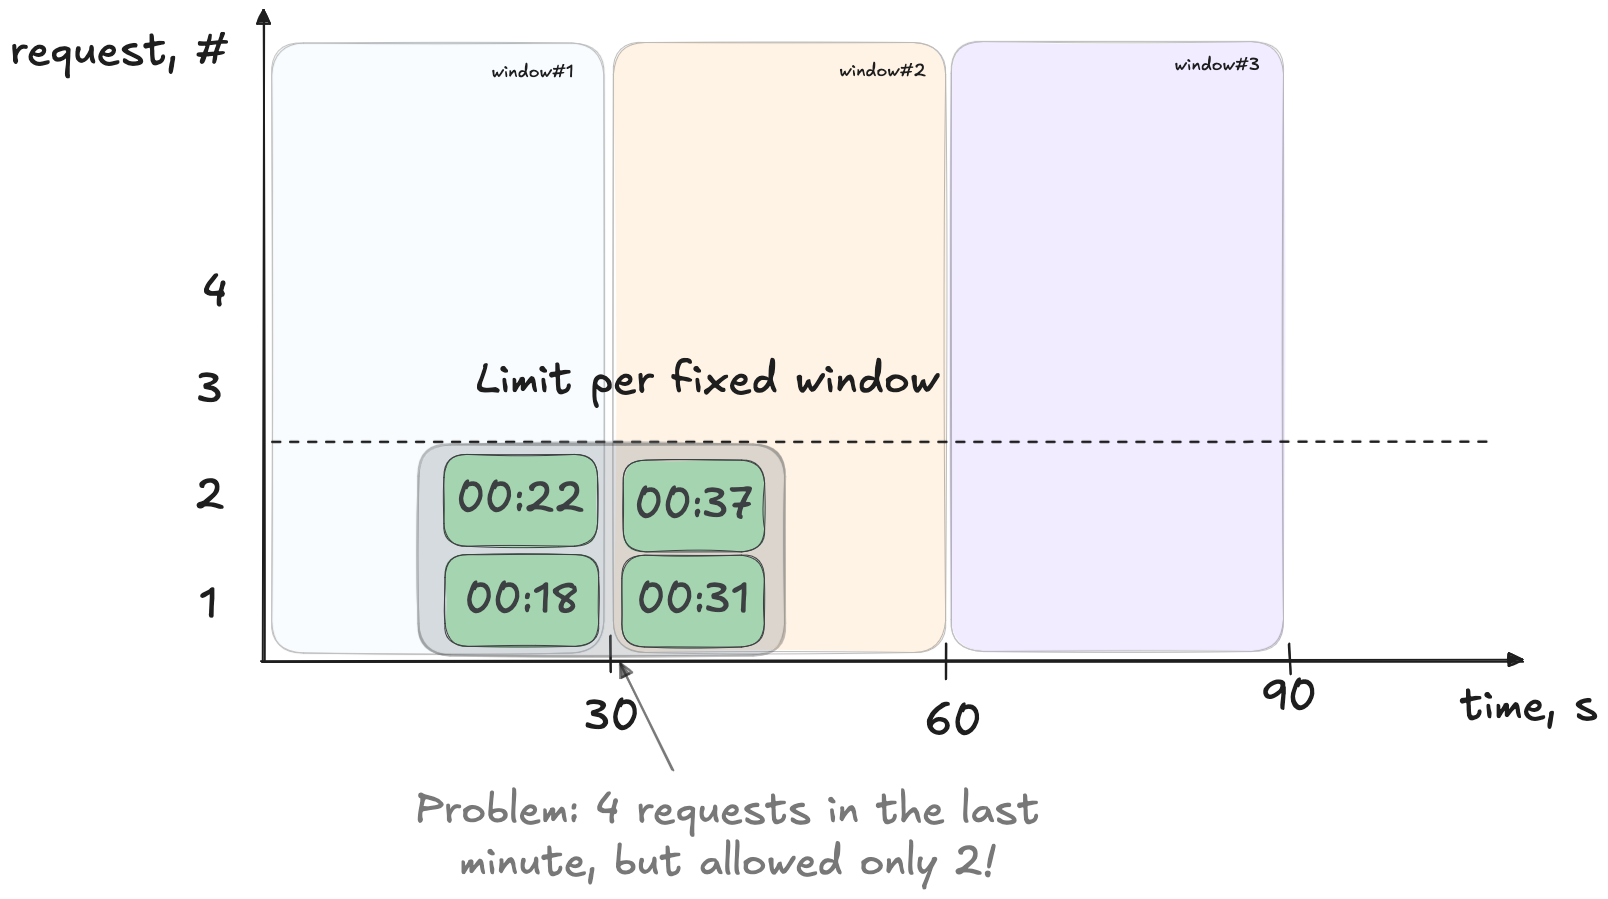
As a result, a total of 4 requests are processed within a 30-second sliding period, despite the limit being 2 per 30 seconds. If such burst patterns are problematic for your workload, consider using a Sliding Window Log or Sliding Window Counter, which we will cover next.
Sliding Window (Timestamp) Log
The Sliding Window Log algorithm addresses the burst issue seen in the Fixed Window Counter by using a dynamic time window. Here’s how it works:
- Maintain a log (or queue) of timestamps for each incoming request.
- When a new request arrives, remove any timestamps that fall outside the defined sliding window (for example, the past 1 minute).
- If the number of timestamps remaining is below the allowed limit, add the new timestamp and allow the request. Otherwise, drop the request.
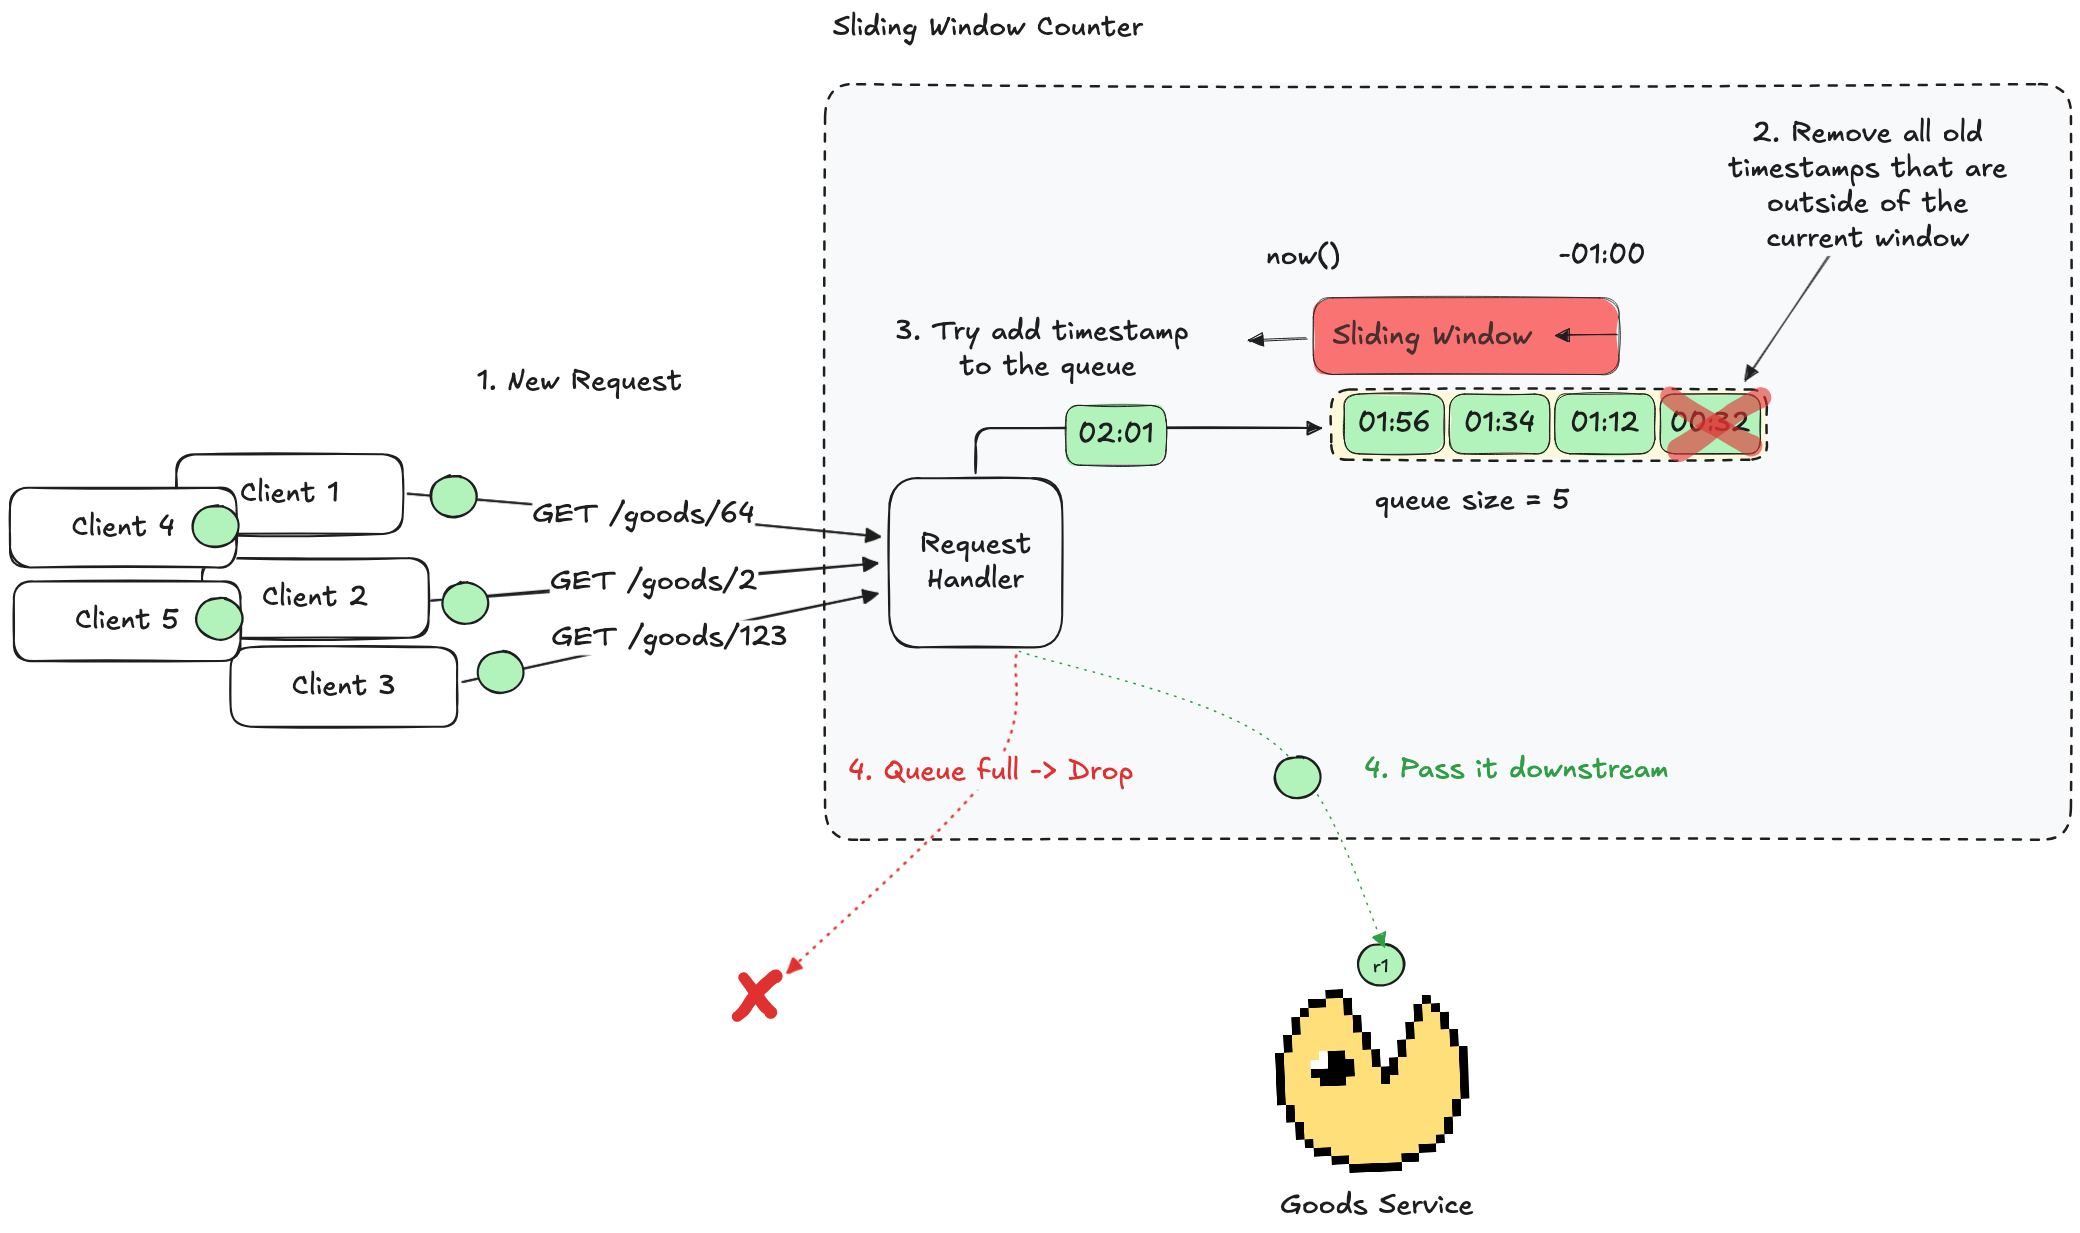
This algorithm resolves the issue of request surges at the boundaries. However, it may not be very efficient in terms of time complexity (up to O(n), where all timestamps are expired and n - size of the queue) and memory usage.
Sliding Window Counter
The Sliding Window Counter offers a compromise between the Fixed Window Counter and the Sliding Window Log and combines their ideas. It maintains memory efficiency (by using only a few counters) while mitigating the burst issue near time window boundaries.
Here’s the concept:
- Define a sliding window duration and a maximum allowed number of requests within that window.
- Maintain counters for the current fixed window and the previous fixed window and the time when they started, so that you can know when to update the past and current windows.
- For a new request, estimate the contribution (weight) of the previous interval to the current sliding window based on the overlap.
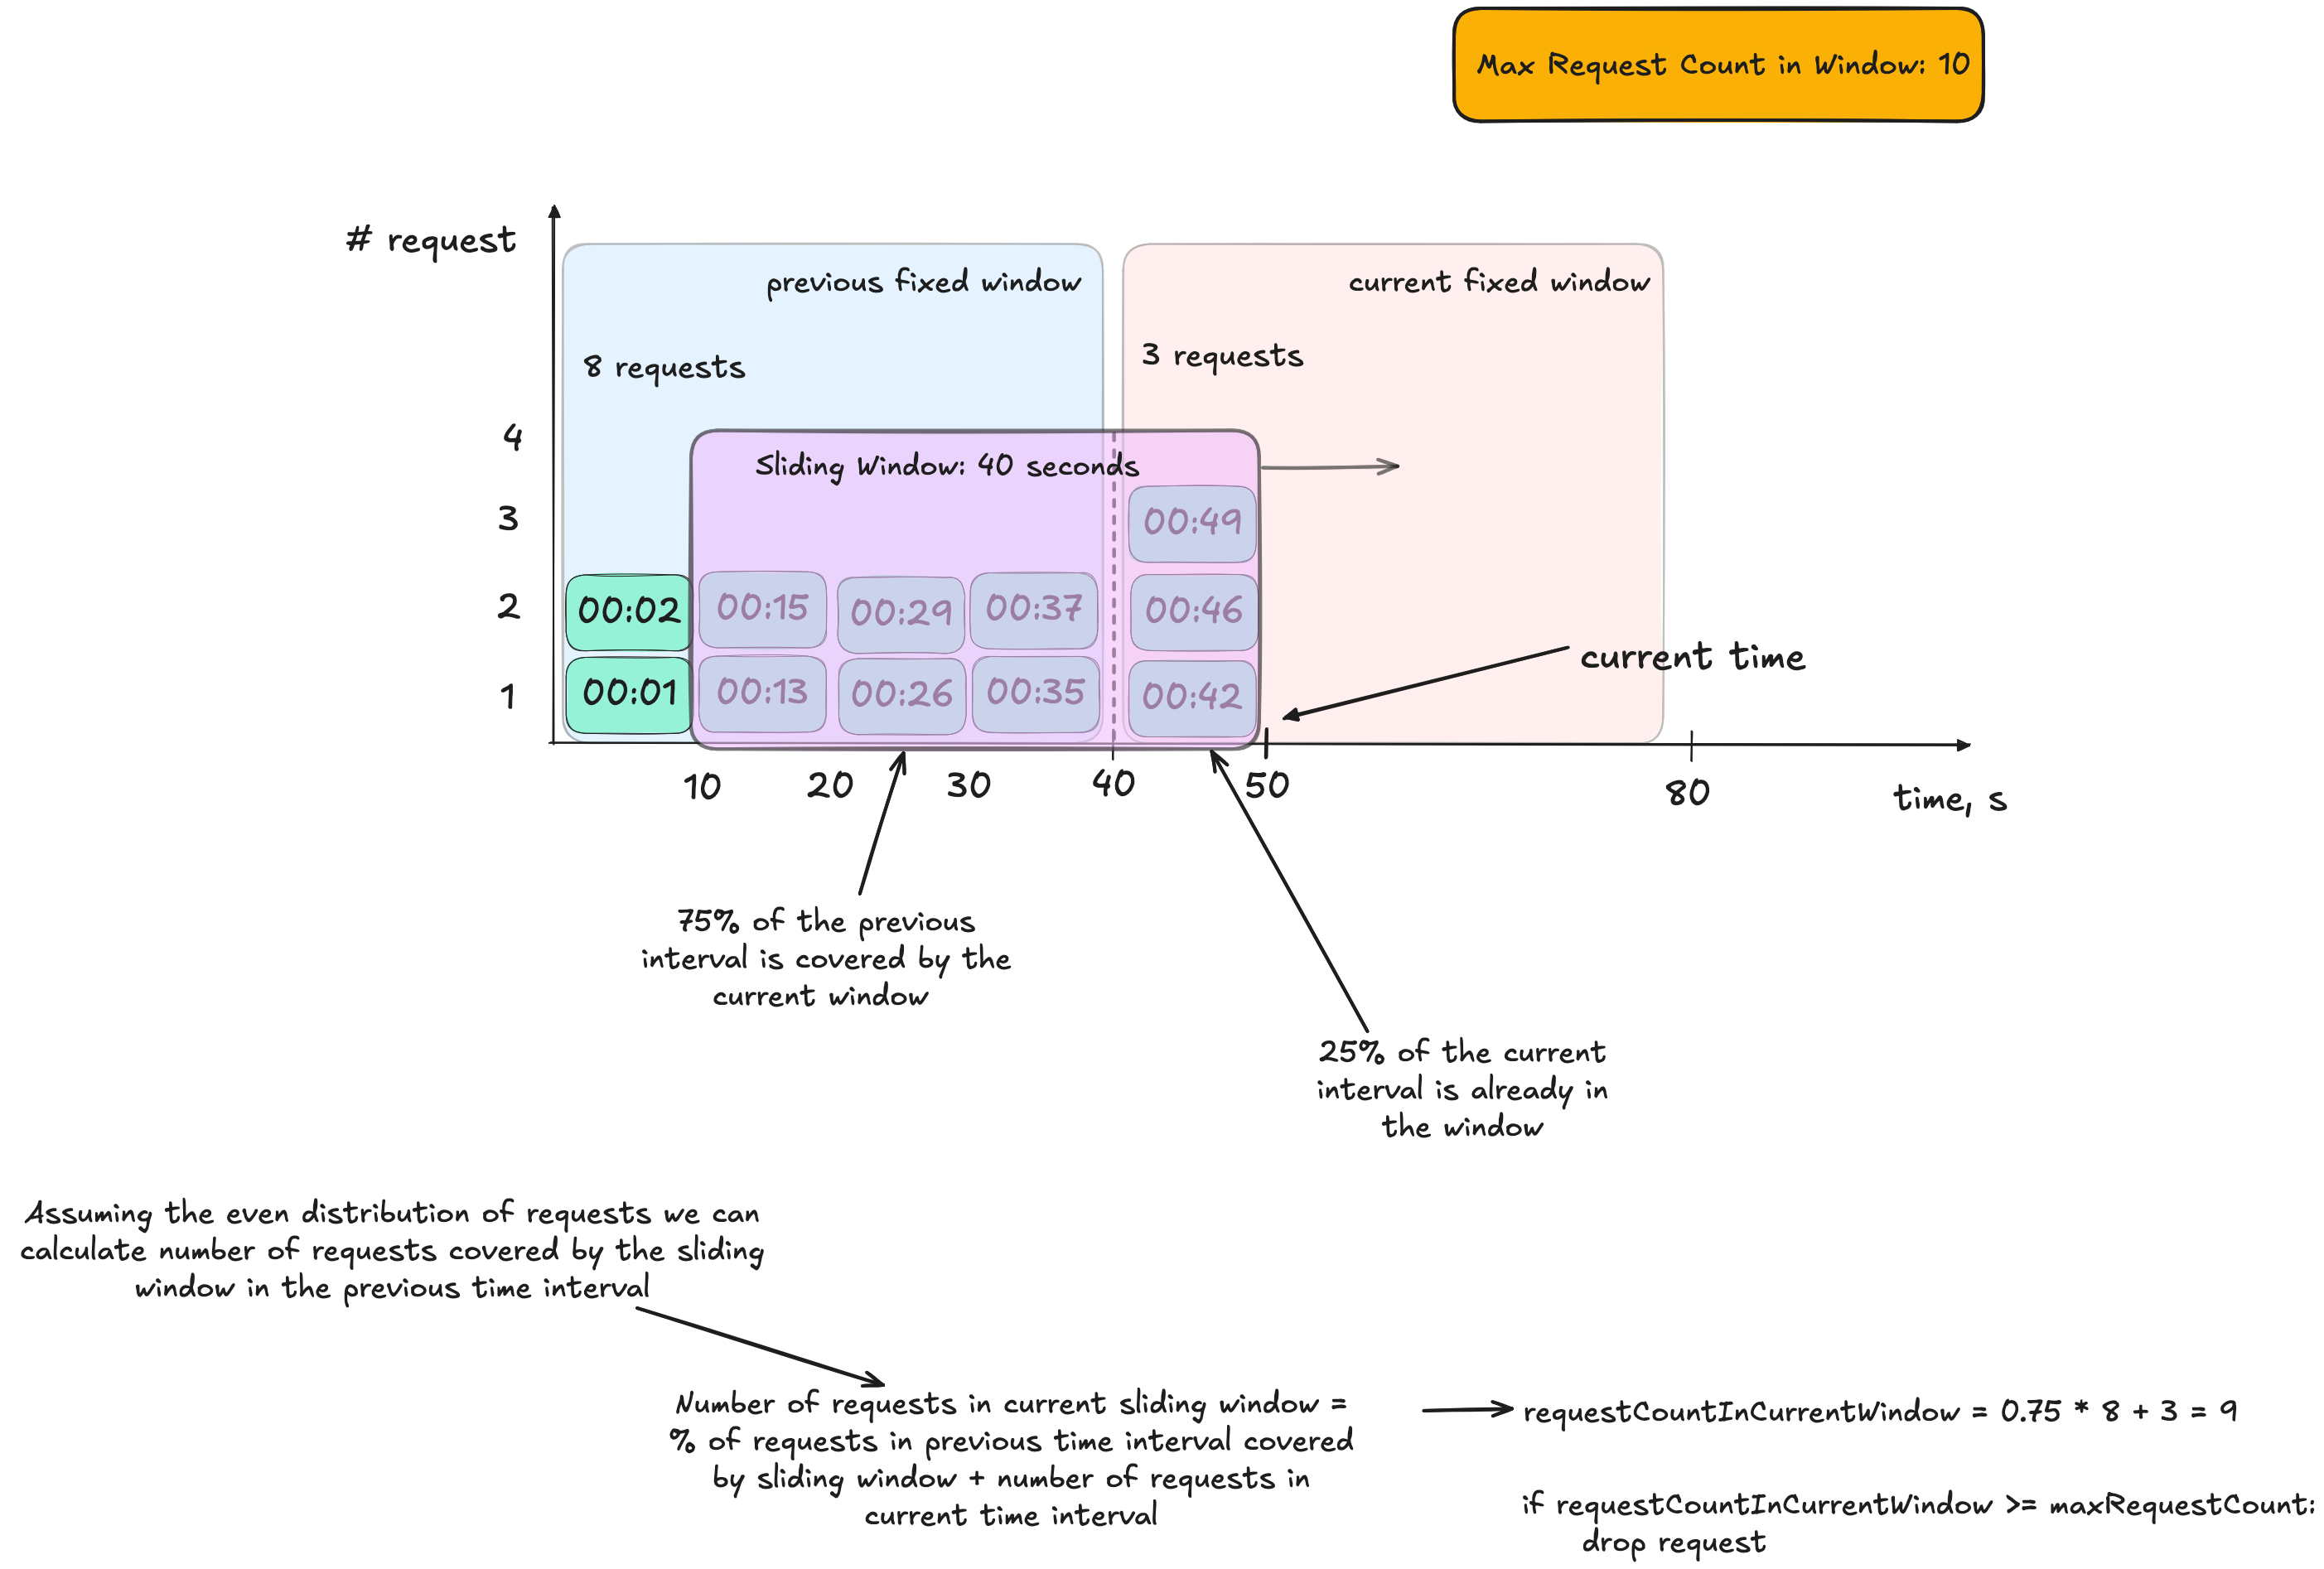
Example:
Suppose you set a 40-second sliding window with a maximum of 10 requests. At time t = 50 seconds, the sliding window spans from t = 10s to t = 50s. Assume:
- The previous fixed window (the 40 seconds before the current fixed window) recorded 8 requests.
- Out of the 40-second window, 30 seconds overlap with the previous fixed window (75%).
- Thus, an estimated
0.75 * 8 = 6requests from the previous interval fall within the sliding window. - If there are 3 requests in the current interval, the total is
3 + 6 = 9requests. - Since 9 is less than the maximum allowed (10), the new request is permitted.
This algorithm offers significant advantages in memory efficiency compared to the previous one, which required a queue of timestamps. However, it is more complex to implement and may incur performance penalties in a distributed environment.
That’s it about rate limiting algorithms. Thanks for reading! 👋